Mixer & Mix Drive
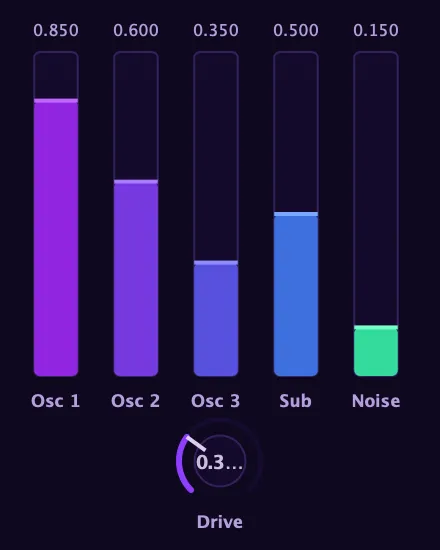
The mixer sets the level of each source before the filter, in the classic Minimoog style, laid out as a channel-strip console: each source is its own framed channel, like a strip on a mixing desk. It also adds Mix Drive, a per-voice overdrive that fattens and saturates each playing voice’s combined signal as you push it, giving you dirt before the filter even touches it. Because it runs per-voice rather than on a shared bus, chords saturate more three-dimensionally: each voice’s harmonics are generated independently, so the result never collapses into a single smeared distortion cloud.
The channel strips
Section titled “The channel strips”The mixer has a channel strip for each sound source. All five run simultaneously; this is not a crossfade or an either-or selection:
| Channel | What it controls |
|---|---|
| Osc 1 | Level of oscillator 1 into the mix. |
| Osc 2 | Level of oscillator 2 into the mix. |
| Osc 3 | Level of oscillator 3 into the mix. |
| Sub | Level of the sub oscillator. |
| Noise | Level of the noise source. |
Because the sources are independent channels (not a crossfade), any combination can be active at once. You can run all three oscillators at full level, or bring in just a whisper of noise, or silence Osc 2 entirely while Osc 1 and 3 play.
Reading a channel strip
Section titled “Reading a channel strip”Each channel is framed and topped with a colour cap that identifies the source at a glance. Inside the frame, from top to bottom:
- A fader sets the source’s level, running alongside a segmented LED meter that lights up with the live signal so you can see how hard each source is actually driving the mix, not just where its fader sits.
- A dB readout shows the fader’s exact gain as a number.
- An M mute button silences that source instantly without moving the fader, so you can drop a layer out and bring it straight back at the level you had set.
- A per-source CHANCE stack (the
%chip, the rarity divider, and the odds readout) lives below the mute. It is covered in full under Per-source Probability below.
The five source strips sit together on the left. The RES return channel is set apart on the right, past a divider and in its own colour (see The RESO return channel), and a horizontal DRIVE slider spans the master band along the bottom (see Mix Drive).
Normalize levels (right-click)
Section titled “Normalize levels (right-click)”Right-click the mixer background (the empty space around the faders, not a fader itself) for Normalize levels. It brings your mix up to full headroom without changing the balance: it scales every un-muted source by the same factor so the loudest one reaches the top of its fader, and the rest keep their exact proportions. Dial in a blend you like at low levels, then normalize it in one click to make it as loud as it can be.
Muted sources and sources sitting at zero are left where they are — only the audible ones are scaled — and it does nothing if the loudest source is already at full or the whole mix is effectively silent.
Per-source Probability (the CHANCE stack)
Section titled “Per-source Probability (the CHANCE stack)”Each channel strip carries a small CHANCE stack below its mute, built around a
% chip showing a percentage: the chance that source sounds on a given
note. At 100% (the default) the source plays every note, so a normal patch is
unchanged. Lower it and that source starts to drop out at random from note to note:
set Osc 3 to 60% and it speaks on roughly six notes in ten while the others play
through.
Each source rolls its own independent dice, so the sources come and go in ever-shifting combinations rather than in lockstep. It is the fastest way to make a static stack of oscillators feel alive and generative: dial back the odds on a layer or two and hold a pattern, and the timbre keeps rearranging itself without ever repeating exactly.
Reaching the rare tail (the rarity divider)
Section titled “Reaching the rare tail (the rarity divider)”The % chip covers the everyday range (1–100%). To go rarer than that — the “fires once
in a long take” surprise that keeps an ambient patch alive for hours — each source has a
rarity divider cell directly below its chip:
| Setting | Meaning |
|---|---|
| ×1 | Off (default): the source fires at exactly the % shown. |
| ÷100 / ÷1k / ÷10k / ÷100k | Divide the % into the rare tail. |
Think of it as scientific notation split across two rows: the % chip is the mantissa
and the divider is the order of magnitude. The firing odds are simply chance ÷ divider,
so a chip at 50% with ÷100 fires 1 in 200, and 20% with ÷1k fires 1 in 5000.
(There is no ÷10 — a 10× drop is just a lower %, which you’d dial on the chip itself.)
A third row under each source is an always-on readout showing what actually fires, in
compact 1:N form (1:200, 1:5k) — so you never have to do the arithmetic. Click or
scroll the divider cell to cycle it; leave it at ×1 and the mixer behaves exactly as before.
The odds are also modulation matrix destinations, one per source: Osc 1 Probability, Osc 2 Probability, Osc 3 Probability, Sub Probability, and Noise Probability. Sweep a source’s odds with an LFO or envelope to fade a layer from “always there” to “rare sparkle” hands-free.
This is the same Probability gate the modulation matrix offers, brought right onto each fader so the odds ride the control they govern. See the probability features for how per-source Probability, the matrix Probability source, and the Probability Filter fit together as one family.
When a source’s Probability fires on a note you can watch it happen: its lane briefly brightens toward the generative accent colour, and the on-screen keyboard shows the oscillators that fired as coloured bands on the playing key. A source left at 100% shows a plain highlight with no band.
The RESO return channel
Section titled “The RESO return channel”Set apart on the right of the mixer, past a thin divider and drawn in its own colour, is a sixth fader labelled RESO. This one is not a sound source. It is the return level of the Sympathetic Resonator, brought out here so you can set how much sympathetic resonance is in the sound right at the mix stage, alongside your source levels, instead of switching over to the resonator panel. It is the same control as the resonator’s own Amount, so moving one moves the other.
The RESO fader also has its own M. Pressing it mutes the whole resonance instantly, without moving the fader, so you can flip the resonance in and out to hear exactly what it is adding and then bring it straight back at the level you had set. When you leave it alone, RESO simply mirrors whatever the resonator is set to, so a patch that never uses sympathetic resonance is completely unaffected.
Balancing oscillators for character
Section titled “Balancing oscillators for character”A few things worth knowing when you start tweaking levels:
-
Equal levels do not mean equal loudness. Different waveforms and models have different peak amplitudes. A Unison saw at 50% fader will hit the mix harder than a sine at the same fader position. Trust your ears over the fader positions.
-
Detuned layering interacts with the fader mix. When two oscillators are slightly detuned from each other, they beat against one another, a slow volume pulse at low detuning, a flangey shimmer at moderate amounts. Their relative level in the mixer affects how prominently the beating sits in the final tone.
-
The sub fader is easy to overdo. At high levels (especially at −2 octave with a square wave shape), the sub can muddy the low end and drive the pre-filter stage hard even before Mix Drive enters the picture. Pull it back until you feel the weight rather than hear the sub as a separate element.
-
All five faders are modulation matrix destinations: Osc 1, Osc 2, Osc 3, Sub, and Noise. You can sweep Osc 2’s level with an envelope for a swell, bring the noise in on an LFO for a trembling breath effect, or have the sub duck in and out with an envelope follower.
Mix Drive
Section titled “Mix Drive”Mix Drive is an analog-style overdrive that sits between the mixer output and the filter input. On the console it is the horizontal DRIVE slider spanning the master band along the bottom of the mixer, under all the channel strips, so it reads as the stage every source passes through on the way out. Every voice’s mixed signal runs through it before anything else in the signal path touches it, which means it colours the material that then gets further shaped by the filter.
At its minimum, Mix Drive is a true bypass: the clean signal path is completely untouched, not just quiet. The moment you move it off zero, the drive stage engages. As you push it:
- The low end softens and thickens slightly, rounding off peaks in a way that feels warm rather than harsh.
- Harmonics accumulate across the frequency range, adding grit and presence to the midrange.
- The top end gets a subtle edge, not a fizz, but a livening of the high harmonics that can make a mix cut better through other instruments.
Push it further and the effect becomes obvious: a driven, saturated quality that lives somewhere between tape saturation and the gain stage of an overloaded mixer. This is not a clean gain stage. It responds dynamically to the signal: louder, more complex mixes (multiple oscillators at high levels, high sub content) saturate more heavily than sparse signals at the same Drive setting.
Mix Drive before vs after the filter
Section titled “Mix Drive before vs after the filter”This placement (before the filter) is the key design choice. It means:
- The filter shapes the saturated signal, not the other way around. Cutoff sweeps through the harmonics Mix Drive added, and those harmonics behave exactly like oscillator harmonics do; they open and close with the filter.
- Increasing Mix Drive makes the filter response feel more dynamic and “pushed”, because the filter is now working with a denser input signal.
- The dirt is per-voice. Each voice saturates independently, which means a chord does not collapse into a single smeared distortion cloud; each voice’s harmonics are generated separately, and the result is thicker and more three-dimensional than a bus-level overdrive would produce.
Mix Drive as a sound-design tool
Section titled “Mix Drive as a sound-design tool”Beyond “add grit”, Mix Drive has a few specific applications worth trying:
-
Fattening a thin oscillator mix. A single DCO saw at modest level is clean and a little thin. Push Mix Drive up and the harmonic enrichment fills the midrange without changing the oscillator settings, effectively giving the oscillator more body.
-
Overdrive that scales with dynamics. Because Mix Drive responds to the amplitude of the combined oscillator mix, playing harder (with velocity routed to oscillator levels or Osc level in the mod matrix) drives it harder automatically. The distortion becomes an expressive response to how hard you play.
-
Pre-filter grit for physical models. The String and Modal oscillators have their own internal character, but feeding them through Mix Drive before the filter adds a layer of saturation that can make a plucked string sound amplified, worn, or wiry rather than pristine.