Using the FX rack
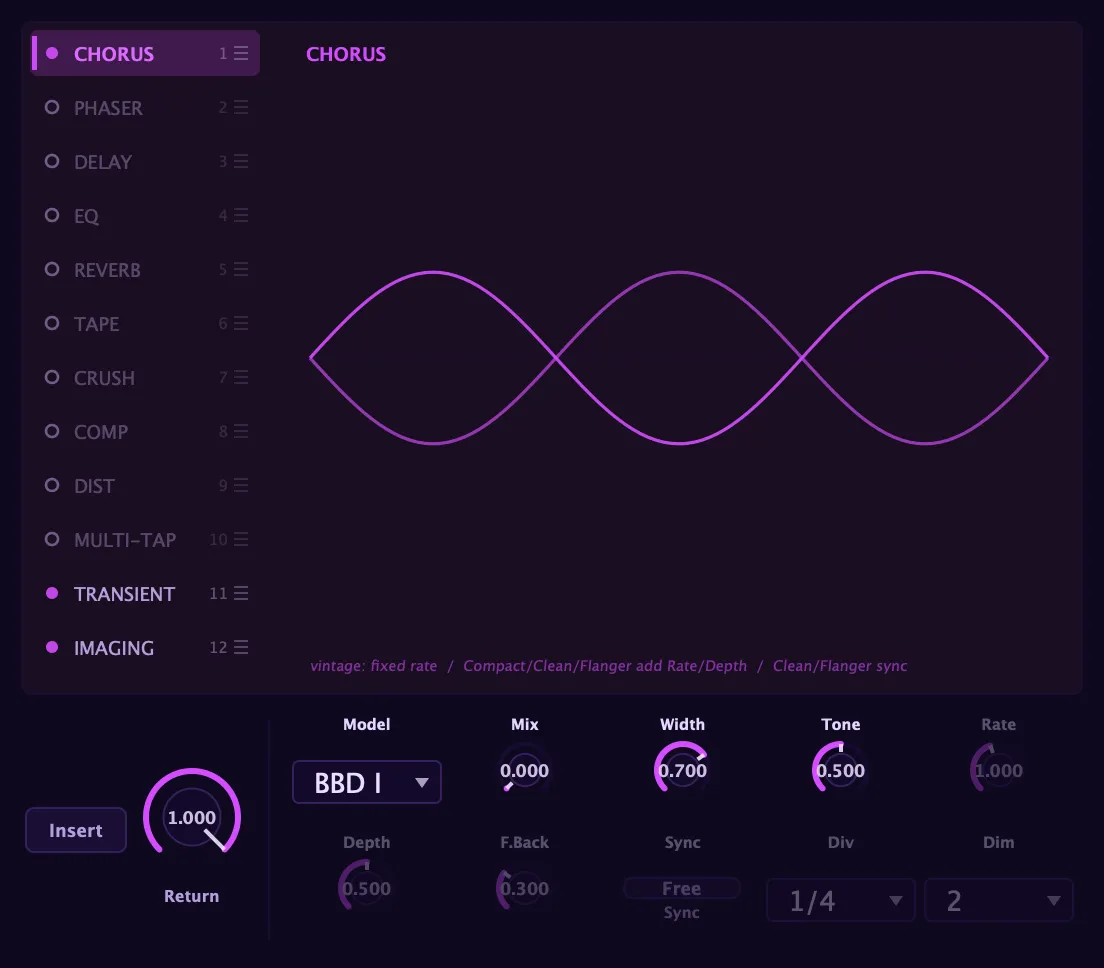
Aconite’s effects live in a 12-slot chain on the stereo scene bus. Each slot can be enabled independently, run as an insert or a send/return, and dragged to reorder, so the same set of effects can sound completely different depending on their order. The master saturation and bus glue controls live in the Master band, distinct from the rack.
Each scene has its own copy of this rack, so Scene A and Scene B can carry completely different effects; the two scene mixes are combined at the shared master stage. Switch which rack you are editing with the Edit: Scene A / B box in the header. See Scenes.
Where the rack sits
Section titled “Where the rack sits”The FX rack processes the mixed, stereo output of all voices together, after the oscillators, the waveshaper, the filters, and the amp. Every voice you play goes through the rack as a single stereo stream, so a reverb tail or a delay repeat wraps the entire ensemble rather than treating voices individually.
Every effect starts with its mix at zero, so a fresh patch passes audio through untouched. You dial in only what you want. The one exception is the parametric EQ, whose mix starts at 100%; it is still transparent on a fresh patch because all its bands start flat, so there is nothing to blend in until you move a gain.
The rack panel
Section titled “The rack panel”The rack presents all twelve effects as a single card. On the left, a vertical list shows each effect in signal-flow order, with three things per row:
- An enable dot to the left of the name; click it to hard-bypass that slot without changing any of its settings.
- The effect name, which you click to select and view.
- The slot number, which follows the effect when you reorder.
Clicking a row selects that effect: its controls and its hero visualization fill the right side of the card. Controls that don’t apply to the current mode or algorithm grey out in place (the layout never jumps around) and a short hint below the controls explains what the current selection has gated off.
Enabling and bypassing
Section titled “Enabling and bypassing”Click the dot to the left of any effect name to toggle that slot on or off. A bypassed slot is fully transparent: the signal passes through as if the slot weren’t there, and all its settings are preserved. This makes it easy to compare a patch with and without a given effect, or to leave a slot dialled in but switched off until you decide you want it.
Reordering the chain
Section titled “Reordering the chain”Drag any row up or down to change its position in the chain. The signal flows through the slots top to bottom in the order you see them. Reordering is non-destructive: the slot’s settings travel with it.
The UI limits two effects to insert only, so they never run as sends: the Multi-tap delay (its Feedback high-pass keeps long regenerating patterns from building low-end mud) and the Stereo imager. Everything else can be either an insert or a send.
Insert vs send/return
Section titled “Insert vs send/return”Each effect independently chooses how it connects into the chain:
- Insert: the effect processes the signal in place, in sequence with the rest of the chain. This is the default. An insert’s dry/wet mix blends the original signal with the processed result at that point in the chain.
- Send/return: the bus taps a copy of the signal, runs the effect at 100% wet, and folds the result back in at a Return level you set. The dry insert path is untouched. Sends run in parallel with each other: a send never feeds another send.
Send mode is ideal for parallel compression (the compressor hears the full signal without affecting the dry path), reverb throws (the dry voice stays up front while a copy blooms into the tail), and blended saturation (tape warmth folded in underneath, not replacing the sound).
No-knob effects: the display is the control
Section titled “No-knob effects: the display is the control”Several effects in the rack have no rows of knobs. Instead the visualization is the control surface: you edit the curve or graph directly, and the picture you are dragging is exactly what the DSP does.
- Parametric EQ — drag the response curve; each node is a band.
- Transient designer — draw the attack/sustain shaping per frequency.
- Bit-crusher — grab the crush band on a spectrum rail, watch the staircase bite.
- Stereo imager — drag the goniometer’s rails for width and balance.
- Reverb — shape the amount canvas: how much reverb each frequency band gets.
- Distortion — drag each band’s drive on an IN-vs-OUT spectrum; the shaded gap is the harmonics the distortion adds, with a live transfer curve for the focused band.
- Phaser — its sweeping notch-comb is carved into the real input spectrum, so you watch the notches travel across the actual sound.
- Chorus — a model-aware wave hero (the animation follows the model you pick) over a comb band-rail on the live spectrum.
Because the on-screen shape holds the parameter values, these effects round-trip exactly with the patch, and there is nothing to “read off a knob” that the display isn’t already showing you.
Band scope on the chorus, phaser, and bit-crusher. These three share one slot layout with a draggable Band window that decides which frequencies the effect actually touches: everything outside the band passes through clean, only the band between the edges gets the effect, and the two recombine exactly, so narrowing the band never loses signal. On the bit-crusher and chorus the band sits on its own rail below the hero; on the phaser it rides as a full-height overlay on the notch-comb. Open a band fully and the effect works across the whole spectrum as usual.
The pop-out corner button. The no-knob editors (and the scope and sequencer elsewhere in Aconite) carry a small glyph in a corner that pops the editor out into a larger, resizable window. Use it when you want the curve, spectrum, and every control room to breathe: the popout is the same editor at a bigger scale, bound to the same live parameters, so anything you change there changes in the compact slot too. It appears on the EQ, the reverb, the scope, and the sequencer.
FX modulation
Section titled “FX modulation”Effect mix levels and key parameters are modulation destinations in Aconite’s bus modulation tier: two bus LFOs and an 8-slot bus matrix. You can route a bus LFO, a macro, an arp lane, or a Curve lane onto reverb size, chorus depth, delay feedback, EQ tilt, master gain, and more, making the whole mix breathe and move over time. See the modulation overview for how the bus tier connects to the rest of the modulation system.
Order matters: practical guidance
Section titled “Order matters: practical guidance”The chain’s order shapes the sound as much as the individual settings. A few principles to orient you:
Distortion before delay and reverb. If distortion follows a long delay, it clips the repeats at their full level: the repeats saturate just as hard as the first note. That can be a valid effect, but it is usually not what you want. Running distortion first lets the delay and reverb process an already-shaped signal, and the repeats decay naturally rather than clipping.
Compression before or after distortion? Before distortion, a compressor evens out the input level so drive behaves predictably: the hit of each note is controlled before it reaches the clipper. After distortion, compression tames the peaks and adds punch, but the saturation character is set by the uncompressed input hitting the drive stage first. Both orders are musically valid; try both.
Modulation effects (chorus, phaser) before or after reverb? Before reverb, the chorus smears pitch into the room and the reverb blurs it further into a washy wash. After reverb, the chorus modulates the already-diffuse tail and the effect is more subtle. For shimmering pads, chorus → reverb is classic. For a cleaner, spacious sound, try reverb → chorus.
EQ last. The parametric EQ works well as a final tone-shaping step after everything else, trimming the result rather than shaping a signal that further effects will alter. That said, EQ before distortion is its own creative tool: boosting the mid before a drive stage emphasises those frequencies in the overtones.
Stereo imager at the end. The stereo imager should almost always be the last slot, working on the final sum. If you place it mid-chain, the effects that follow it won’t know about the width changes.
Tape early for analogue character. Tape saturation works like a “colour” stage: running it early in the chain means every subsequent effect processes an already warmed-up signal. Running it late applies the warmth and wow/flutter on top of effects like reverb, which can make a tail flutter realistically.
The default slot order (chorus → phaser → delay → reverb → tape → bit-crusher → compressor → EQ → distortion → multi-tap → transient shaper → stereo imager) is a sensible starting point, but none of it is fixed. Drag freely.